

Magento 2 does not offer functionality to create customer attribute from admin panel itself. Often in your project, you want to add a customer attribute and show it on customer registration form. In this post, we will see how to add a customer attribute programmatically and display it on customer registration form.
Getting Started: Development
Step 1: Create InstallData.php file under app/code/Codextblog/Customattr/Setup directorty and enter below code
<?php

namespace CodextblogCustomattrSetup;

use MagentoEavSetupEavSetup;
use MagentoEavSetupEavSetupFactory;
use MagentoFrameworkSetupInstallDataInterface;
use MagentoFrameworkSetupModuleContextInterface;
use MagentoFrameworkSetupModuleDataSetupInterface;

/**
 * @codeCoverageIgnore
 */
class InstallData implements InstallDataInterface
{
    /**
     * EAV setup factory
     *
     * @var EavSetupFactory
     */
    private $eavSetupFactory;

    /**
     * Init
     *
     * @param EavSetupFactory $eavSetupFactory
     */
    public function __construct(EavSetupFactory $eavSetupFactory)
    {
        $this->eavSetupFactory = $eavSetupFactory;
    }

    /**
     * {@inheritdoc}
     * @SuppressWarnings(PHPMD.ExcessiveMethodLength)
     */
    public function install(ModuleDataSetupInterface $setup, ModuleContextInterface $context)
    {
        /** @var EavSetup $eavSetup */
        $eavSetup = $this->eavSetupFactory->create(['setup' => $setup]);
        if (version_compare($context->getVersion(), '1.0.0') < 0){

				$objectManager = MagentoFrameworkAppObjectManager::getInstance();
				$customerSetup = $objectManager->create('CodextblogCustomattrSetupCustomerSetup');
				$customerSetup->installAttributes($customerSetup);


		}

    }
}
Step 2: Create CustomerSetup.php file under app/code/Codextblog/Customattr/Setup directory and enter below code
<?php

namespace CodextblogCustomattrSetup;

use MagentoEavModelConfig;
use MagentoEavModelEntitySetupContext;
use MagentoEavSetupEavSetup;
use MagentoFrameworkAppCacheInterface;
use MagentoFrameworkSetupModuleDataSetupInterface;
use MagentoEavModelResourceModelEntityAttributeGroupCollectionFactory;

class CustomerSetup extends EavSetup {

	protected $eavConfig;

	public function __construct(
		ModuleDataSetupInterface $setup,
		Context $context,
		CacheInterface $cache,
		CollectionFactory $attrGroupCollectionFactory,
		Config $eavConfig
		) {
		$this -> eavConfig = $eavConfig;
		parent :: __construct($setup, $context, $cache, $attrGroupCollectionFactory);
	}

	public function installAttributes($customerSetup) {
		$this -> installCustomerAttributes($customerSetup);
		$this -> installCustomerAddressAttributes($customerSetup);
	}

	public function installCustomerAttributes($customerSetup) {


		$customerSetup -> addAttribute(MagentoCustomerModelCustomer::ENTITY,
			'token',
			[
			'label' => 'Token',
			'system' => 0,
			'position' => 100,
            'sort_order' =>100,
            'visible' =>  true,
			'note' => '',


                        'type' => 'varchar',
                        'input' => 'text',

			]
			);

		$customerSetup->getEavConfig()->getAttribute('customer', 'token')->setData('is_user_defined',1)->setData('is_required',0)->setData('default_value','')->setData('used_in_forms', ['adminhtml_customer', 'checkout_register', 'customer_account_create', 'customer_account_edit', 'adminhtml_checkout']) -> save();

	}

	public function installCustomerAddressAttributes($customerSetup) {

	}

	public function getEavConfig() {
		return $this -> eavConfig;
	}
}
Step 3: Override frontend layout file in our custom module. Create customer_account_create.xml file under app/code/Codextblog/Customattr/view/frontend/layout directory and enter below code
<?xml version="1.0"?>
<page xmlns:xsi="http://www.w3.org/2001/XMLSchema-instance" xsi:noNamespaceSchemaLocation="urn:magento:framework:View/Layout/etc/page_configuration.xsd">
    <body>
        <referenceContainer name="content">
            <block class="MagentoCustomerBlockFormRegister" name="customer_form_register" template="Codextblog_Customattr::form/register.phtml">
                <container name="form.additional.info" as="form_additional_info"/>
                <container name="customer.form.register.fields.before" as="form_fields_before" label="Form Fields Before" htmlTag="div" htmlClass="customer-form-before"/>
            </block>
        </referenceContainer>
    </body>
</page>
Step 4: Override customer registration form template file in our custom module to add the custom attribute html. Copy register.phtml file from vendor/magento/module-customer/view/frontend/templates/form directory and paste it under app/code/Codextblog/Customattr/view/frontend/templates/form directory. Enter below lines under the form tag.
<?php
//add token attribute
<div class="field">
    <label class="label" for="token"><span><?php /* @escapeNotVerified */ echo __('Token') ?></span></label>
    <div class="control">
        <input type="text" name="token">
    </div>
</div>
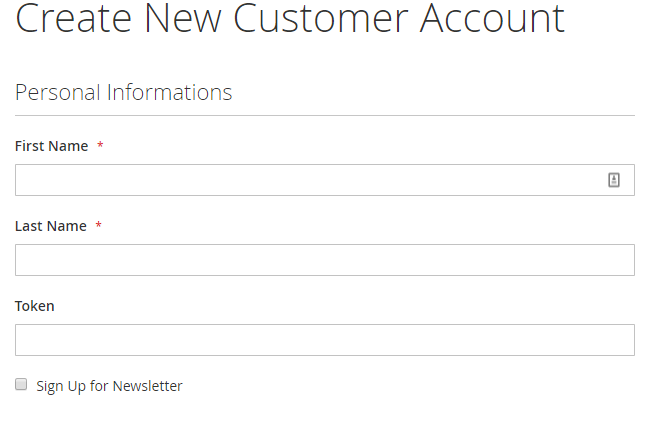
Hooray! Our customer attribute has been invoked in registration form! Same way you can add it on account information edit form.
if you have any questions, feel free to submit them in the comment section below!